Make the one-handed backhand a real option
Use early preparation, comfortable backhand spacing and a measured finish to stop avoiding that side.
Understand the job.
A backhand is played on the side opposite your paddle hand. A one-handed version can offer useful reach, but it needs timely preparation. Practise it directly rather than running around every backhand feed and leaving the court exposed.
Backhand movement study
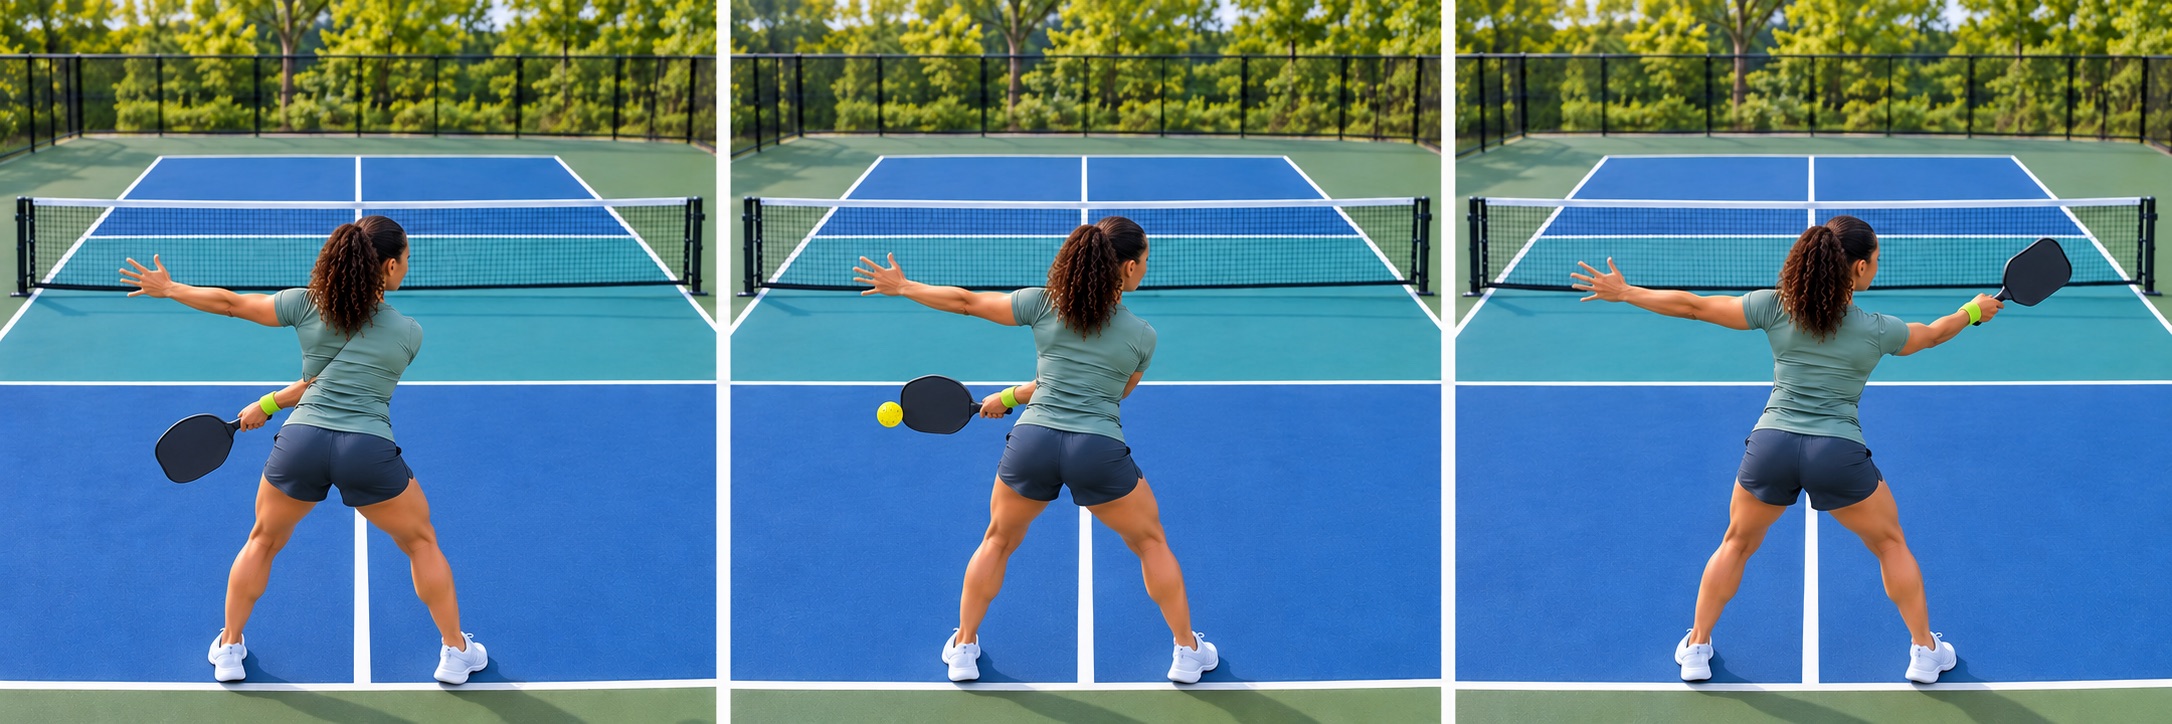
AI-generated movement study showing a fictional player from behind, facing the net. The lime band identifies the same right paddle wrist in every frame. Two-handed backhands add the bare left hand above the right on the handle. Use the written steps for technique and official rules for legality. Left-handed players reverse side-specific cues where appropriate.
Position, contact, recovery.
Where the movement starts
Create room on the side opposite your paddle hand. Turn early enough to bring the paddle across your body, rather than waiting until the ball reaches your feet. The net remains the direction of play even as your shoulders turn.
Read the contact
The illustrated player stays right-handed: her right arm carries the paddle across to her left for preparation and contact. The left hand remains free for this one-handed variation. The lime band follows the same right wrist through the finish.
Check it with a partner
Ask a partner to identify the gripping hand at preparation, contact and finish. Use slow bounce feeds and a generous middle target. If the arm feels cramped, adjust your feet and contact space instead of adding a late wrist flick.
Official court dimensions ↗Step by step.
- 01
Turn before the ball crowds you
Carry the paddle across the body with the shoulders. Your free hand can help organise the preparation before releasing. Move the feet to create room on the backhand side.
- 02
Meet it ahead of the body
Let the hitting arm travel comfortably forward. Keep the face stable enough to send the ball through a broad target. Avoid locking the elbow or forcing a large wrist snap.
- 03
Finish and cover the next shot
Complete the stroke without over-rotating or falling sideways. Return to ready and cover the space your movement has opened. Directional control is the first goal.
When it goes wrong.
Waiting until the bounce to turn
Start preparing from the incoming flight instead.
Opening the face at the last instant
Use slower feeds to establish a steady contact angle.
Practise this with a partner.
The partner sends slow bounce feeds to the backhand near the baseline. Begin with one repeatable height and a broad middle target, leaving room for the hitter to turn and recover.
Start here: Play ten deliberate backhands. Carry the paddle across early, keep the same gripping hand and let the free hand balance. Pause whenever the bounce crowds your hip.
Open all three rounds, a solo option and four-player rotation ↗Backhand confidence set
A suggested BracketReady practice task. The counts are your observations, not a skill-rating test.
Set it up
A partner sends 20 easy bounce feeds to your backhand. Use a broad middle target.
Do the work
Play all 20 as backhands rather than running around the ball. Count target hits and keep one note about the contact spacing.
Count this
One-handed backhands reaching the middle target. Record attempts and target hits using the same definition throughout.
Log this practice in Matchday ↗Sign in to save. Existing practice-log allowances apply. Log sessions you actually completed.Make it fit your level.
Start close to your partner with gentle half-court feeds.
Add cross-court targets and a recovery step after each contact.
Mix the same backhand feed with an occasional forehand.
Know what you are reading.
Original BracketReady explanation and practice design from the BracketReady learning desk, with the technique reference below. For individual technique feedback, work with a qualified coach.
Photo sequences use a consistent fictional player, wardrobe, equipment and court. Some guides share a relevant movement study; the written lesson explains the specific variation.
References checked 23 October 2026. Event rules and official updates take precedence.
Your next useful read.
A forehand groundstroke you can repeat
Create contact space, turn comfortably and finish towards a broad target before increasing drive speed.
Build a comfortable two-handed backhand
Explore two-handed preparation, contact space and recovery without forcing an uncomfortable grip or losing reach.
Develop a controlled topspin drive
Add a low-to-high paddle path while preserving clearance, placement and readiness for the next ball.